Why should you use a surface primer?
So, you’re going to paint a model? Have you ever tried painting a plastic/resin/metal model without priming it first? I don’t recommend this futile act. Most plastic, resin and metal surfaces are loathe to take paint without applying a primer first. Reapers says that you can paint their Bones line of models without priming. I’ve tried, and unless you’re globbing the paint onto the model with a spoon it doesn’t really work all that well. Models need primer, because primer provides your subsequent layers of paint a texture onto which it will grip. Generally speaking, paint adheres to a model through a mechanical bond (think super glue, not plastic cement – that’s another article). In other words, paint catches in the micro-recesses on the model’s surface and clings to these imperfections. The shinier/smoother the model, the worse paint will stick. So, we want to prime a model to make the surface textured? Yes, but you don’t want to add a lot of texture, just enough to let the paint grip.
Why do we use primer in a can?
Does primer do anything else beside let our paint grip our models better? Yes, it also can form a chemically resistant layer the protects the surface paint from coming detached from the model when certain advanced painting or weathering techniques are used (like applying a solvent-based paint or hair spray weathering, etc.). I recently learned from MisterJustin at Secret Weapon Miniatures that not all primers are created equal; there are evidently two major types of surface primer that we use in this hobby, solvent-based enamal and water-based acrylic polyeurethane. He says that the reason we prefer to use enamal primer on models is that once dried alcohol-based solvents and other weathering techniques will not disolve the enamel primer, whereas they can cause failure with an acrylic primer. Now, all of that said, I tend to use an acrylic polyeurethane primer on my models because I can shoot it through my airbrush all year long, but I haven’t applied any advanced weathering techniques yet and the alchohol based metallic paints seem to be okay so far on top of the primer (I guess time will tell). Anyway, the primer you get at your hobby supply store, or from your game manufacturer is almost assuredly an enamel primer, and is your best choice if you can work with its application restrictions.
NOTE: Recently, I overheard another painter suggest that Testor’s makes an enamal primer in a bottle. It may be possible to thin this with the right solvent and spray it through an airbrush with similar results to rattle can enamel primer, but I haven’t tested it myself. Using a solvent in your airbrush may shorten the life of your seals or cause issues with the finish of the airbrush. You should also use a respirator when spraying solvents (but then you should use a respirator when applying anything through an airbrush).
Why do we use $15 a can primer?
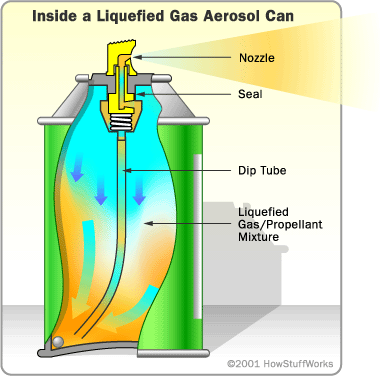
So, you don’t need to use expensive primer, but there actually might be a reason why you want it (or something like it). Rattle cans we buy (not including specialized cans for grafitti artists) generally come with one of three types of nozzles: 1) regular spray, 2) line spray, and 3) fine mist. You really want the fine mist nozzle because you want to apply as little primer as is necessary to create a grippy surface without over-priming. Over-priming can cover details on your model and it can actually create a shiny surface that loses mechanical adhesion. Primer application is like Goldilocks (not too much, not too little, just right). Citadel primer comes with a fine mist nozzle, where other manufacturers do not, and what you want more than anything is the fine mist nozzle.
NOTE: Recently, I heard the Independent Characters talk about Orchard Supply and Hardware (OSH) primer. They were very happy with the product for only a few dollars. My friend, and site contributor, Stephen has also tried this product and says that he really likes it as well. I’ll need to check out the nozzle to see what sort it is.
Graffiti artists know it all
If you want to know everything there is to know about rattle cans and their nozzles, check out these links:
http://granjow.net/sprayCaps.html
http://www.grafcaps.com/index.php?main_page=page_2&zenid=fcq501eluqcu2n4l39me6r6m47
What color primer should I use?
Talk about a loaded question, right? The answer depends on how you paint; however, I am going to suggest that you use white primer. Firstly, with your new knowledge about primer you will no longer douse your models in primer. Just enough primer to lightly dust the model and see a slight color change is all that you need. White primer on a grey plastic, resin or white metal model is not going to make the model white, just lighter than it was before the primer; it will end up being a light grey. If you want to use a zenithal priming technique like I teach in my Introduction to Painting and Modeling class then you might also use Black (and grey) primer, but this is not necessary to get a good surface prime. The bottom line is that the color is only important to the style of painting that you employ. The technique you use for applying primer is most important for the longevity of the model and the level of detail on the model.
Wait, what’s that you say? “White primer gets chucky or frosts my model!” Many people are afraid of using Citadel (or insert other brand here) white primer. Let me assure you that this is not your primer’s fault. Unfortunately, primer should come with better instructions (well at least you should read them). I’ll cover this in application technique below.
How do I apply primer?
How you apply primer is perhaps more important than just about anything else. You can compensate for the wrong nozzle type, heat, etc. if you know what you’re doing. If you aren’t an expert in primer application foloow these steps and you should always get good results.
1. Start with a clean, dry surface
Personally, I use a mild dish soap and toothbrush to lightly clean all of my models before priming. However, I’m told that most resins are cast using a paintable mold release agent and don’t need to be washed. This same source said that resin will absorb water and may become more brittle. On the other side, I’ve also heard that some Forgeworld models will seep an oily substance unless washed well. I’m not sure how to advise you in light of these contradictions. I lightly wash all my models and dry using compressed air (from a can or my air compressor). I do not use a hair dryer. If your resin or metal model has any really glossy surfaces, consider using a fine sanding tool (200 grit or finer) to likely scuff the surface to improve adhesion of your primer.
2. Use in good weather
Ideally, you should not prime your model with an aerosol paint unless temperatures are between 50°F and 90°F, and relative humidity is below 85%. I’m inclined to want temperatures between 60°F and 80°F, with relative humidity below 60% (yes, I know this is easy in California and not everywhere else). What most people don’t realize is that the frosting or flaky white primer is caused by priming in direct sunlight and/or hot, humid weather. Never, ever prime your models in direct sunlight. When you do the paint drys before it comes in contact with your model creating this horrible flakey finish. Trust me, you didn’t get a “bad” can, you painted in “bad” weather. Every game store owner should tell their customer this one thing when they sell primer.
NOTE: If you must paint in these circumstances then you’ll need to compensate by holding the paint can closer to your model (making that fine mist nozzle even more important).
3. Be aware of spray paint recoat times
This is generally not an issue for primer application. You’re not going to let the paint dry completely before adding more if you find you don’t have even coverage. However, if you get inside and later determine that you need to add more primer, recoat time should be stated in the directions on the can. If you don’t follow the recoat timing instructions you could have paint failure (resulting in lost adhesion).
4. Mix your paint in the can
Everyone knows that you’re supposed to shake your can of spray paint before using it, right? Well, not exactly, it turns out. Think of the pea (or ball) in your can as a stir stick in your can of paint. Shaking it is like jabbing a stir stick up and down. It just doesn’t have the same effect. I’ve heard from at least one source that shaking a can on paint may actually dislodge some of the dried paint that resides along the edges. I’m not sure, but I can tell you that you want the ball to stay on the bottom of the can, and just spin around the outside edge. Do this for 30 seconds. Turn the can upside down and repeat, then turn the can back right side up and do it again. Don’t cheat, spend a full 1-2 minutes agitating the paint for best results.
5. Test your spray paint and painting technique
Ensure a smooth, even spray paint application by testing your paint and painting technique on a scrap surface or inconspicuous area before beginning your project. Good common sense right? I suggest that you always start and stop spraying away from or off the model, using an even side-to-side motion with each pass. With most aerosol paints, spray 6 to 10 inches from surface (if you’re too close, the paint may bubble and run. If you’re too far away, the paint will be spotty and dry). If you’re spraying a tank or other large object you should overlap your spray pattern by about one-third. You’ll want to practice before painting large flat surfaces so that you do not end up with tiger stripes. Always use multiple thin coats instead of one thick coat. It is possible to have paint failure caused by flashing – when you apply multiple thick coats and the paint adheres to itself instead of the model.
6. Be mindful of overspray
Since you will most likely be painting outdoors, be midful of your surroundings. You may need to mask exposed areas with tape or use a drop cloth. I like to use a cardboard box to make a painting hood to catch overspray.
7. Ventilate
I’m going to suggest that you never spray an aerosol paint indoors. However, if you must spray paint indoors, always ventilate your room well by opening windows and doors. A fan may also help to keep air circulating. If you paint indoors, please use a respirator to protect yourself.
8. Clean spray paint valve after use
Turn can upside down and spray for 5 seconds, or until the spray is clear. This helps prevent the spray tip from clogging by evacuating the paint from the nozzle by expending propellant. Yes, this will use your propellant faster, but would you rather coat fewer models better, or more models with a poor finish?
9. Read directions thoroughly
Before beginning your project, be sure to read the directions on the can. You might learn something new.


